I posted before that I would probably start working on one of the 27s next. And I was going to, really. But then I was looking at the 15-87's wiring and decided to pull the motor off. Then take the motor apart. Then start cleaning the case of the motor. Then start cleaning the mounting bracket. Then cleaning the pedestal where it looks like the motor wiring caught on fire against it. Well, then I just had 15-87 pieces all over the place. The steel wood and Dremel came out.
The 27s are back in line as I tinker with the 15-87. It has cleaned up nicely. I don't know if I can get the badge discoloration from the electrical fire fixed, but I'll keep working on it.


The finish on the rim of the hand wheel is just sitting wrong with me. I'm looking at one of those home nickel plating kits to fix that. I also have plenty of other pieces that would appreciate a refreshing on their shine as well.


Weird composition on this one, I know. I just wanted to get the shiny bobbin winder in the shot as well as the stitch regulator.
For cleaning this time I followed my normal routine with a couple of changes.
- I skipped the Trader Joe's soap. It might be good if you have a clean machine you just want to keep that way. But on super grungy machines it just turns the lacquer weird colors.
- Instead I went to the old standby, Singer sewing machine oil. I did about 6 applications over the course of three days. I would wipe some on in the morning, in the evening wipe it off and put on another coat. It did a pretty good job. Though it did make the rubbing compound streak a lot when I got to that step.
- Speaking of the Turtle Wax rubbing compound I did to exactly what I said not to do after the adventure with Black Swan. I went over the decals with it. But this time rather than rubbing with a damp cloth. I gently (very very very gently) wiped with a drenched cloth. It worked great. I was going to post some before and after photos of the back decals where it was most noticeable, unfortunately they were covered by the light in all my before pictures. They were completely obscured by slime that the sewing machine oil did nothing to remove. The rubbing compound got it off great, without damage, as you can see above. It took about an hour of delicate wiping, but it was worth it. I ended up cleaning all the decals that way. It makes a huge difference in the final appearance. You end up with a nice smooth finish, rather than the clean black/smudged decals you get if you avoid the graphics. One more time, VERY gentle application.
- Evaporust, still. The jug says it's good for 300lbs of metal. I've probably ran five pounds through it at this point. So still using it. Meh results.
- Eagle One Nevr-Dull (Yes it's spelled like that on the can). Pretty good on things you don't need a super shine on. Works well as a cleaner before using Mother's. I wouldn't use it by itself on the plated parts though.
- Turtle Wax Performance Plus Carnauba Cleaner Wax. Cawabunga, Dude! Like I said, after using the rubbing compound I had a lot of streaks. Really obvious streaks. The carnauba wax lifted them all right off.

I didn't really go after the bottom end. Just took a brush to get all the dust bunnies out then some steel wool to clean away most of the grime. The hook assembly came out and I gave it a good cleaning but everything else was cleaned in place.
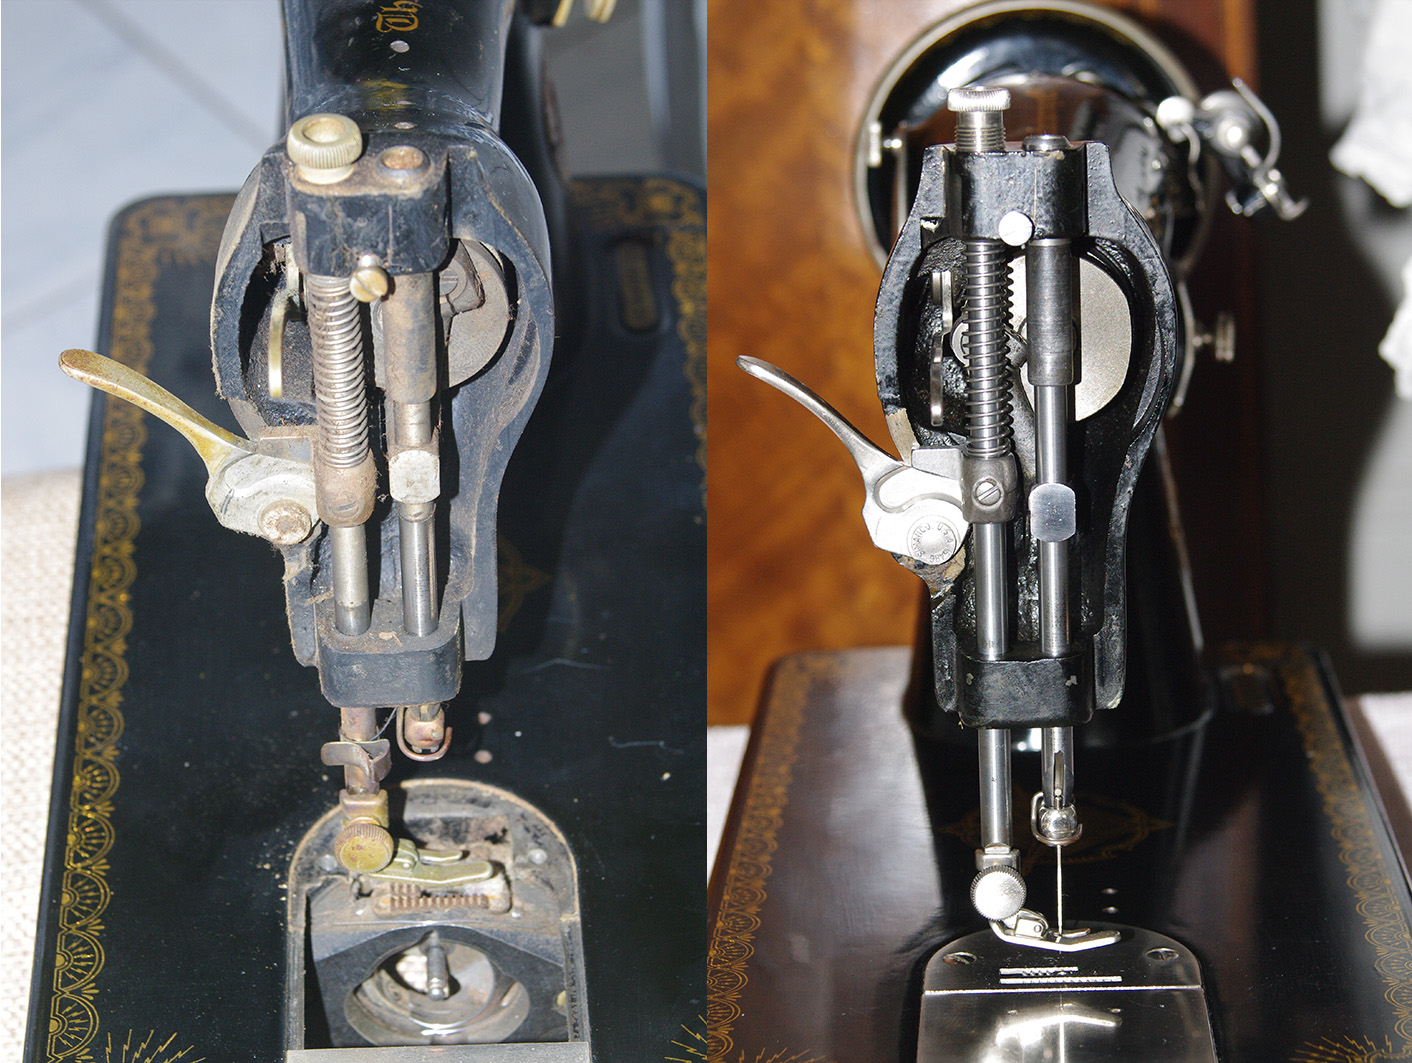
A good before and after of the needle bar and presser assemblies. Other than the presser foot lever everything was just cleaned with a Dremel then wiped down with Nevr-Dull. The lever then got shined up with Mother's.

This one was just because the feed dogs were such a mess before. Probably the worst kept part of a poorly maintained machine.
The motor is still off. I need to get to the hardware store to pick up some wiring for it. After I get it back together I'll give the machine another cleaning (the photographs highlighted some areas I need to work a bit more on).
So I noticed that I haven't had a rant yet. This is a blog, so I should rant about something. So here goes. LAZY RESELLERS! Why do people buy from these folks?
Okay I had a longer rant, but I got it out of my system then deleted it. Basically this: If you want a beautiful old sewing machine. Buy a crappy old sewing machine and fix it up yourself. It is stupid easy, you'll save hundreds and you will do a better job for yourself than someone just wanting to make a quick buck off you will do.
hi there- i came across your site, looking for information about 15-87's. Can i ask how you tell the difference between a 15-87 and a 15-97? I seem to have this exact machine (thread tension on the end, RAF decals) what's really strange is you say it looks like you had a fire around the cords. the cords on mine are all melted as well. I look the motor off today to see if it could be rewired with a new power/plug. Anyway- i'd love any help advice you can offer! i love all your old machines- beautiful and so worth your time and love.
ReplyDeleteThe bobbin winders are the difference. 15-86/7 have the older style bobbin winder with the cams and moving guide. the 15-96/7/8 have the newer style like the 15/91. Good catch though, I had mine backwards, they are 15-87s. Not sure why I changed them to 15-97.
DeleteYou can rewire the motor. It's a very common issue with all older electrical devices. The insulation rots, wires get exposed and short out. If you have never done it before there are some helpful guides on youtube. Just to be safe, have someone check your work before you test it. It's not difficult just when you a working with electricity you want to be overly cautious.